Basic Information
The MetaWare Development Toolkit supports building and debugging for ARC-V processors.
IDE: The MetaWare IDE does not support ARC-V targets; instead, a VS Code plugin is provided as a
.vsixfile in theMetaWare/arc/lldbacfolder. You must have an installed instance of VS Code from Microsoft to use this extension. See Installing the Visual Studio Code Extension.The extension adds support for ARC-V debug sessions using the ARC-V MetaWare debugger. It supports basic debug operations such as running, halting, stepping, reading/writing registers, inspecting variables, setting breakpoints, and so on. The extension also includes some custom windows, for example an ARC-V Traps window and a Disassembly window.
Compiler: The MetaWare
ccaccompiler driver supports building for ARC-V.ccacis an enhanced compiler driver tuned for maximum efficiency and providing smooth migration path for existing ARC users. See the MetaWare CCAC Programmer’s Guide for details. You can also build using theclangacdriver, which is compatible with the LLVM defaultclangdriver. This driver is the best choice for migrating existing code from non-ARC processors. See The First MetaWare Sample Application.Assembler: The
ccacandclangacdrivers invoke an LLVM assembler behind the scenes. If you need to invoke the assembler directly, usellvm-asac. The MetaWareasacassembler does not support ARC-V.Linker: The MetaWare linker supports linking for ARC-V using the
ccacdriver or usinglldacdirectly. See the MetaWare ELF Linker and Utilities User’s Guide for details.
Debugger: The MetaWare debugger supports ARC-V targets; see the dedicated documentation in
/MetaWare/arc/docs/pdf/arc-v. The debugger uses the nSIM simulator, which supports ARC-V targets.Utilities: It is best to use the LLVM versions of ELF utilities provided in
/binfor ARC-V builds. For example, it is better to usellvm-objdumpinstead ofelfdump. The classic MetaWareelfdumpis not updated to perform disassembly of ARC-V instructions. You can still use the classic MetaWare utilities, but some features (such as disassembly) are not available for ARC-V targets.
Known Issues and Limitations
Up-to-date lists of known and fixed issues are available online at https://www.synopsys.com/dw/doc.php/arc_tools/dw_arc_metaware/user_docs/mwdtkf/index.html.
Installation and Licensing
See the section on installation and licensing in the MetaWare Quick Start Guide.
The First MetaWare Sample Application
Building the Queens Example
A simple working Queens demo that shows how to compile, link, and execute a program for an ARC-V target is available in MetaWare/arc/examples/arcv_queens.
Prerequisite:
Run setenv_mwdt.bat (.sh on Linux) in the top-level directory (ARC/ by default) to set the environment variables that describe where the MetaWare Development Toolkit and nSIM are installed.
Makefiles are provided for ccac and clangac.
Makefile
This makefile uses CCAC to compile and link the program. It is then run on nSIM directly (no debugger).
Makefile.clang
This makefile uses the Clang driver to compile and link the program and run it directly on nSIM (no debugger).
This method is a bit more complicated because you have to tell Clang where the C runtime is and how to use that runtime during compiling and linking.
Normally you place this information in a configuration file and then invoke Clang with that configuration file. For the steps to create and use a configuration file, see https://clang.llvm.org/docs/UsersManual.html#configuration-files
Use the following commands to clean and build the example:
% make clean              # clean the output files
% make a.out              # build executable a.out using ccac
% make -f Makefile.clang clean     # clean the output files
% make -f Makefile.clang a.out     # build executable a.out using clangac
This method uses the semihosting interface.
Alternative Compilation
% ccac -tcf=rmx100_base.tcf -O2 -g queens.c
This method uses the Hostlink interface, which is a MetaWare-specific host-access library.
To use the standard RISC-V compatible semihosting interface, add -Hhostlib=semihost to the ccac options.
Running the Queens Example in nSIM
The tools for ARC-V include the nSIM simulator. You can invoke the standalone nSIM simulator for ARC-V using the nsimdrv driver or the runrv convenience script.
To execute the Queens demo on an ARC-V nSIM simulator, use the Makefile in MetaWare/arc/examples/arcv_queens.
% make run
The alternative way is to use the nsimdrv driver or runrv script directly from the console:
% nsimdrv -tcf ${METAWARE_ROOT}/arc/tcf/rmx100_base.tcf a.out     # Running the executable in nSIM using nsimdrv driver (Hostlink interface)
% runrv -semihost -Za -Zm -Zbb a.out                         # Running the executable in nSIM using runrv script (semihosting interface)
Be sure to launch the simulator with the same hosting interface as specified in the executable (Hostlink or semihosting). If the run is successful, the following message appears in the console.
go
    1   5   8   6   3   7   2   4
Debugging
Command-Line Interface
Launch the debugger:
% lldbac a.out
Launch the simulation from inside the debugger and connect to it:
> platform connect my_core nsim-gdb-properties="tcf=rmx100_base.tcf nsim_semihosting=1"
Omit nsim_semihosting=1 if your program was compiled with the Hostlink interface.
Start the executable:
> process launch -s
Break on main, _exit and Try:
> b main
> b _exit
> b Try
Skip the startup code:
> c
Now we are at main, continue:
> c
List local variables:
> var
Show backtrace:
> bt
Execute until next line:
> n
> n
> var
Evaluate an expression:
> p I+3
> c
> c
> var
Show and remove a breakpoint:
> break list
> break del 3
> c
Print the list of functions sorted by how many times a profiling counter was incremented during function execution:
// Launch nSIM with instruction-counter support.
> platform connect my_core nsim-gdb-properties="tcf=rmx100_base.tcf icnts=1"
> process launch -s
// Print the list of available counters.
> display prof
// Print the list of functions sorted by the values of the "pc-frequency" counter.
> display prof pc-frequency
// For more information about the profiling command:
> display prof --help
Exit the debugger:
> q
[Y]
Installing the Visual Studio Code Extension
To run a GUI session, install and configure the VS Code extension using the following steps.
Install VS Code from the official site, https://code.visualstudio.com/download.
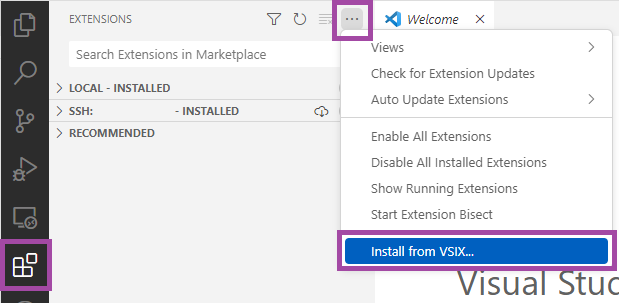
Open it and go to the Extensions tab.
Click the Ellipsis icon (…) in the top right corner of the Extensions tab and select Install from VSIX….
- Go to location of the file from the installed MWDT package. Replace
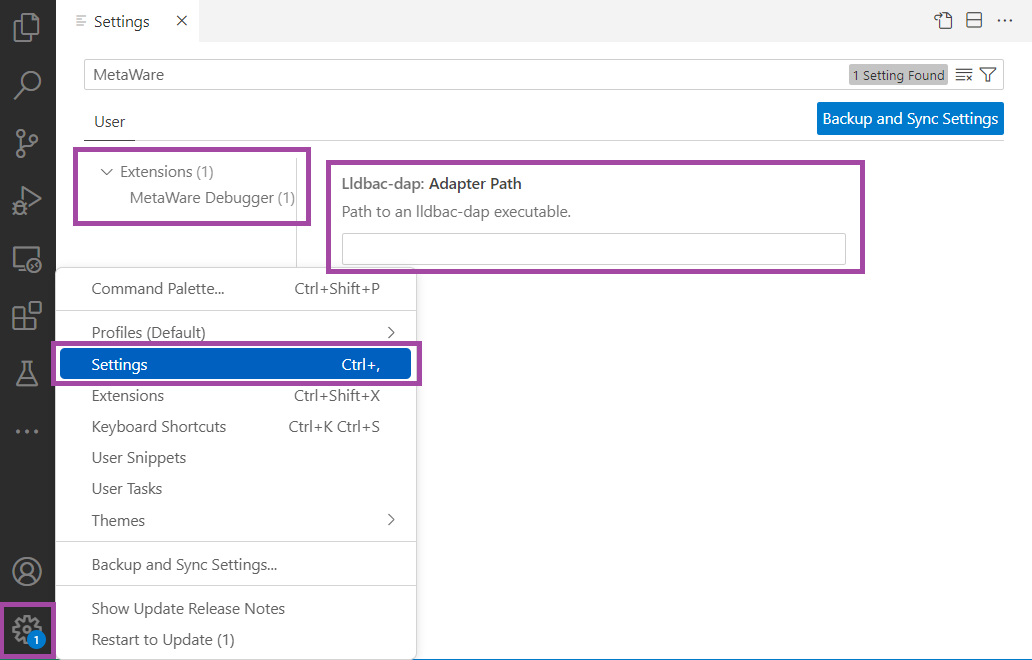
<METAWARE_ROOT>with actual MetaWare root:<METAWARE_ROOT>/arc/lldbac/synopsys-mdb-*.*.*.vsix, where *.*.* is a version, for example, it might be 2023.6.6. Go to Settings > Extensions > MetaWare Debugger > Adapter Path and enter the path to this executable. Replace
<METAWARE_ROOT>with the actual MetaWare root on your host:On Windows:
<METAWARE_ROOT>/arc/bin/lldbac-dap.exeOn Linux:
<METAWARE_ROOT>/arc/bin/lldbac-dap
Debugging with Visual Studio Code
After installing the Visual Studio Code extension, execute the following steps to create a new launch configuration:
Open your workspace folder.
Go to Run and Debug tab.
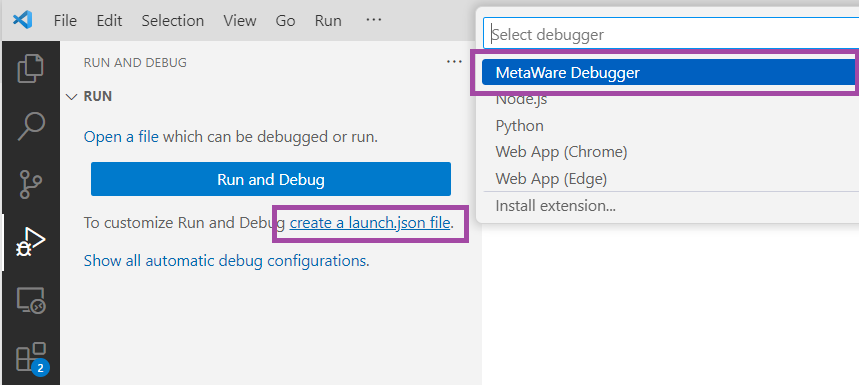
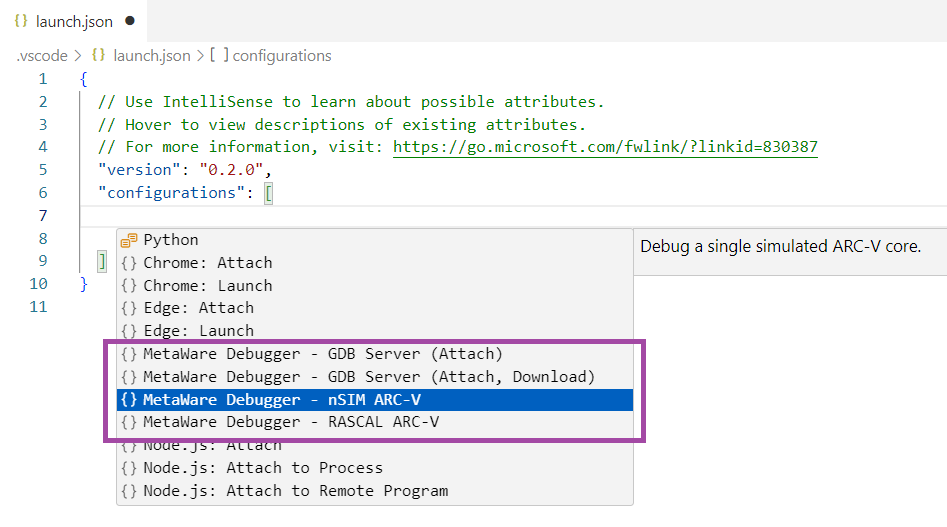
Click on create a launch.json file and select MetaWare Debugger.
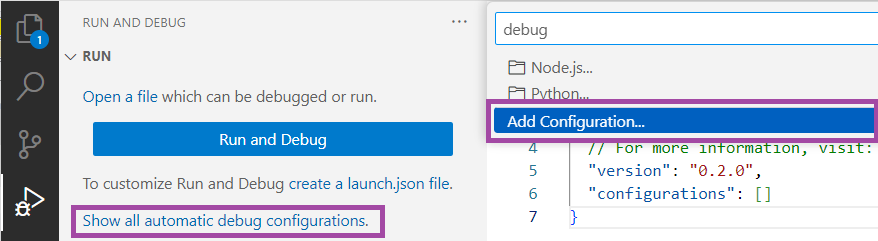
Click on Show all automatic debug configurations, select Add Configuration and select one of the
MetaWare Debugger - *templates.
Enter details in all the highlighted fields.
Save the file.
Execute the following steps to run the new debug configuration:
Go to Run and Debug tab.

Select the configuration as per the requirement, in the dropdown menu.
Click the Start Debugging button near the dropdown menu.
Any errors in the debugger launch, are displayed in the bottom right part of VS Code GUI. See the MetaWare Debugger User Guide for more details.
After starting the debug session in VS Code, you can debug the application using a GUI interface. Below is a brief description of the main GUI debugger features.
Disassembly:
Go to ARC Displays and select the Disassembly window.
Breakpoints:
In the Source window, double-click before the line number on a code line.
In the Disassembly window, double-click before the instruction address on an instruction line.
Go to Breakpoints to navigate and set properties of breakpoints.
Execution control:
Use the debugger control panel to run, stop, step and restart actions.
Show registers: - Go to ARC Displays > Registers and select the corresponding register panel (Debug Registers, Traps, Machine Counters, General Purpose Registers).
Show variables:
Go to Variables and select the corresponding panel (Locals, Globals).
Call stack:
Go to Call Stack and navigate using the functions.
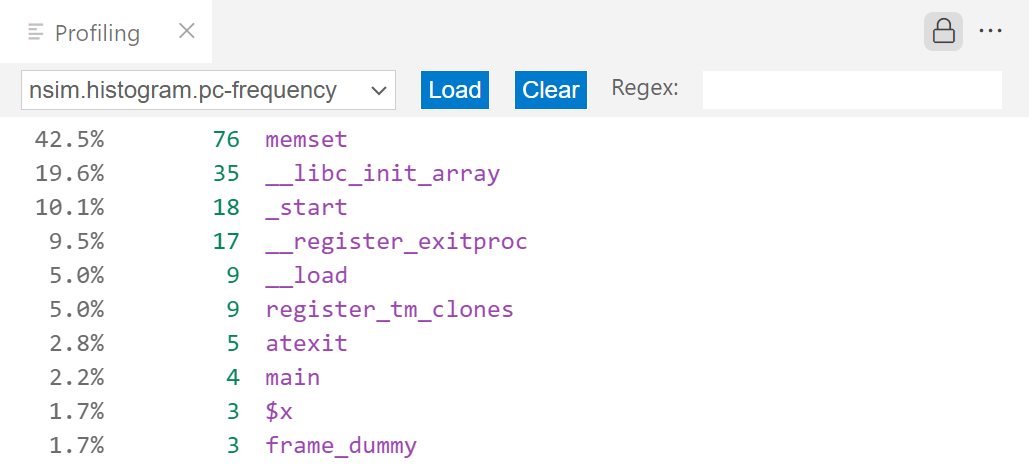
Profiling:
To see the list of functions sorted by how many times a profiling counter was incremented during function execution:
Enable profiling in the simulator. For nSIM, add the
icnts=1property to thensim-gdb-propertiesarray in the debug session configuration.Go to ARC Displays and open the Profiling window.
Select a profiling counter in the dropdown list and click the
Loadbutton.
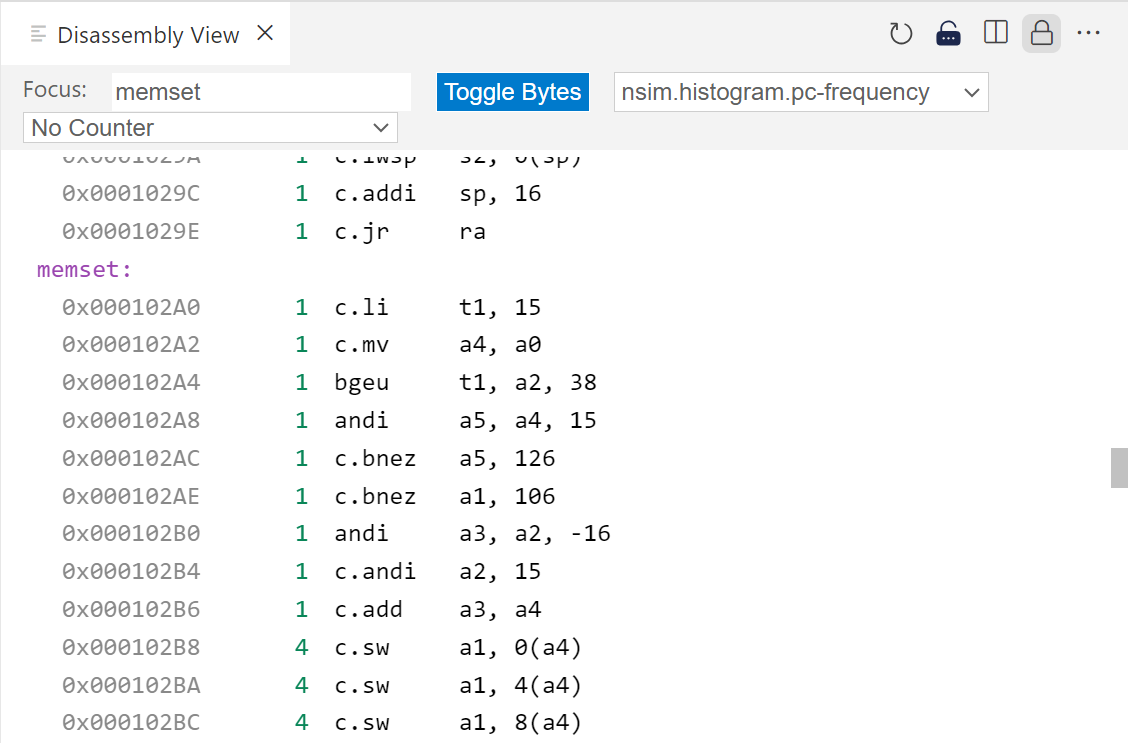
To see how many times a profiling counter was incremented while executing the code at each address:
Enable profiling in the simulator. For nSIM, add the
icnts=1property to thensim-gdb-propertiesarray in the debug session configuration.Go to ARC Displays and open the Disassembly View window.
Select a profiling counter in the rightmost dropdown list.
Check the column that appears to the right of the address column. Each entry in this column indicates how many times the counter was incremented while the counter was executing the instruction at the corresponding address.
Generating Custom ARC-V Libraries
Many extensions are available for RISC-V/ARC-V targets. However, a few
TCF templates are shipped with the MetaWare Development Toolkit, like rmx100_base.tcf
and rhx100_base.tcf, with
corresponding sets of precompiled libraries. Sometimes it is necessary to generate a set
of standard libraries optimized for a particular combination of extensions. You can achieve
this using the buildlib utility.
The following is an example for the default RMX100 configuration:
buildlib arcv_rmx100 -bd . -av5rmx -Zicsr -Zifencei -Zihintpause -Zba -Zbb -Zbs -Zca -Zcb -Zcmp -Zcmt -Zicbom
Then you can use this library instead of a default one by adding the -Hlib=<full-path>/arcv_rmx100 option on the command line.
If you want to add support for the f and d extensions, do the following (-Zcmp and -Zcmt
are removed since they are incompatible with d extension):
buildlib arcv_rmx100_fpu -bd . -av5rmx -Zicsr -Zifencei -Zihintpause -Zf -Zd -Zba -Zbb -Zbs -Zca -Zcb -Zcf -Zcd -Zicbom
See the MetaWare ELF Linker and Utilities User’s Guide for details regarding buildlib utility.