Application Development
General Build and Run Steps
There are a lot of examples and demos in embARC OSP which are located in
<embarc>/example folder. General steps are shown below to build the
provded examples and demos, e.g. the example in
<embARC>/example/baremetal/bootloader for the EMSK 2.2 board and ARC EM7D
core configuration.
1. Go to the example directory,
cd <embARC>/example/baremetal/bootloader.<embARC>should be replaced by your actual path such asc:/embARC. Use\instead of/in the Windows environment.
Run the
makecommands * Commands for using MetaWare toolchain
Command common part:
gmake BOARD=emsk BD_VER=22 CUR_CORE=arcem7d TOOLCHAIN=mwBuild:
gmake BOARD=emsk BD_VER=22 CUR_CORE=arcem7d TOOLCHAIN=mwRun:
gmake BOARD=emsk BD_VER=22 CUR_CORE=arcem7d TOOLCHAIN=mw JTAG=usb runDebug:
gmake BOARD=emsk BD_VER=22 CUR_CORE=arcem7d TOOLCHAIN=mw JTAG=usb guiGenerate binary:
gmake BOARD=emsk BD_VER=22 CUR_CORE=arcem7d TOOLCHAIN=mw JTAG=usb binShow build configuration:
gmake BOARD=emsk BD_VER=22 CUR_CORE=arcem7d TOOLCHAIN=mw JTAG=usb cfgShow build options:
gmake BOARD=emsk BD_VER=22 CUR_CORE=arcem7d TOOLCHAIN=mw JTAG=usb optClean current build configuration:
gmake BOARD=emsk BD_VER=22 CUR_CORE=arcem7d TOOLCHAIN=mw cleanClean current all configurations for the same board:
gmake BOARD=emsk BD_VER=22 CUR_CORE=arcem7d TOOLCHAIN=mw boardcleanClean current all configurations in this example:
gmake BOARD=emsk BD_VER=22 CUR_CORE=arcem7d TOOLCHAIN=mw distclean
Commands for using ARC GNU toolchain
Command common part:
make BOARD=emsk BD_VER=22 CUR_CORE=arcem7d TOOLCHAIN=gnuBuild:
make BOARD=emsk BD_VER=22 CUR_CORE=arcem7d TOOLCHAIN=gnuRun:
make BOARD=emsk BD_VER=22 CUR_CORE=arcem7d TOOLCHAIN=gnu JTAG=usb runDebug:
make BOARD=emsk BD_VER=22 CUR_CORE=arcem7d TOOLCHAIN=gnu JTAG=usb guiGenerate binary:
make BOARD=emsk BD_VER=22 CUR_CORE=arcem7d TOOLCHAIN=gnu JTAG=usb binShow build configuration:
make BOARD=emsk BD_VER=22 CUR_CORE=arcem7d TOOLCHAIN=gnu JTAG=usb cfgShow build options:
make BOARD=emsk BD_VER=22 CUR_CORE=arcem7d TOOLCHAIN=gnu JTAG=usb optClean current build configuration:
make BOARD=emsk BD_VER=22 CUR_CORE=arcem7d TOOLCHAIN=gnu cleanClean current all configurations for the same board:
make BOARD=emsk BD_VER=22 CUR_CORE=arcem7d TOOLCHAIN=gnu boardcleanClean current all configurations in this example:
make BOARD=emsk BD_VER=22 CUR_CORE=arcem7d TOOLCHAIN=gnu distclean
Visit Build System Documentation for more build system information.
Create a New Application
Here, we will show how to create a new application in embARC OSP, taking a simple hello world as an example.
Goals
Baremetal application based on embARC OSP
Hardware: EMSK 2.2 - ARC EM7D Configuration
Print “Hello world from embARC” through UART at 115200 bps
Use GNU toolchain to running and debugging in the command line
Creat a folder named
hello_worldunderembarc/example.Copy the makefile template
example/example.makefileandmain.c.tmplintohello_worldfolder and renameexample.makefiletomakefile, renamemain.c.tmpltomain.c.Change the configurations in makefile according to your hardware configuration and application.
Change the application name: change the value of
APPLtohelloworld.Change the board name: change the value of
BOARDtoemsk. This option can also be given in cmd line If not specified, the default value will beemskChange the board version: change the value of
BD_VERto22.This option can also be given in cmd line If not specified, the default value will be22for boardemsk.Change the core configuration: change the value of
CUR_COREtoarcem7d. This option can also be given in cmd line. If not specified, the default value willarcem7dfor boardemskand version22.Change the embARC OSP root: change the value of
EMBARC_ROOTto../...EMBARC_ROOTcan be relative path or an absolute path.Add the middleware that you need for this application: Change the value of MID_SEL.
The value of
MID_SELmust be the folder name in<embARC>/middleware, such ascommonorlwip.If using
lwip,ntshell,fatfs, andcommon, setMID_SELtolwip ntshell fatfs common.Set it to
commonin the “HelloWorld” application.
Change your toolchain: change the value of
TOOLCHAINtognu.Update source folders and include folder settings.
Update the C code folder settings: change the value of
APPL_CSRC_DIRto..APPL_CSRC_DIRis the C code relative path to the application folderUpdate the assembly source-folder settings: change the value of
APPL_ASMSRC_DIR.Update the include-folders settings: change the value of
APPL_INC_DIRwhich is the application include path to the application folder (-I).If more than one directory is needed, use whitespace between the folder paths.
Set your application defined macros: Change the value of
APPL_DEFINES.For example, if define
APPLICATION=1, setAPPL_DEFINESto-DAPPLICATION=1.
Then
hello_worldapplication’s makefile will be like this## embARC application makefile template ## ### You can copy this file to your application folder ### and rename it to makefile. ## ## # Application name ## APPL ?= helloworld ## # Extended device list ## EXT_DEV_LIST += # Optimization level # Please refer to toolchain_xxx.mk for this option OLEVEL ?= O2 ## # Current board and core ## BOARD ?= emsk BD_VER ?= 22 CUR_CORE ?= arcem7d ## # Debugging JTAG ## JTAG ?= usb ## # Toolchain ## TOOLCHAIN ?= gnu ## # Uncomment following options # if you want to set your own heap and stack size # Default settings see options.mk ## #HEAPSZ ?= 8192 #STACKSZ ?= 8192 ## # Uncomment following options # if you want to add your own library into link process # For example: # If you want link math lib for gnu toolchain, # you need to set the option to -lm ## #APPL_LIBS ?= ## # Root path of embARC ## EMBARC_ROOT = ../.. ## # Middleware ## MID_SEL = common ## # Application source path ## APPL_CSRC_DIR = . APPL_ASMSRC_DIR = . ## # Application include path ## APPL_INC_DIR = . ## # Application defines ## APPL_DEFINES = ## # Include current project makefile ## COMMON_COMPILE_PREREQUISITES += makefile ### Options above must be added before include options.mk ### # Include key embARC build system makefile override EMBARC_ROOT := $(strip $(subst \,/,$(EMBARC_ROOT))) include $(EMBARC_ROOT)/options/options.mk
run and debug
Set your EMSK 2.2 hardware configuration to ARC EM7D, and connect it to your PC. Open
PuTTYorTera-term, and connect to the right COM port. Set the baudrate to 115200 bps.Enter
make runin the command line to run this application.Enter
make guiin the command line to debug this application. Press CTRL + C to stop the program. Enterqto exit the debugger. See the GDB manual for how to debug an application using arc-elf32-gdb.
Note
See Make Options for make options in detail. You can
also refer to other embARC examples, e.g.,
example/baremetal/openthread, example/freertos/net/ntshell.
IDE Project Usage
Run and debug an embARC application in the ARC GNU IDE
A embARC “helloworld” application has been created and tested. This section provides steps for debugging the application in the ARC GNU IDE.
Open the ARC GNU IDE and set the workspace location to ide_projects/emsk_22/gnu in the embARC root. Set the workspace location in a right way.
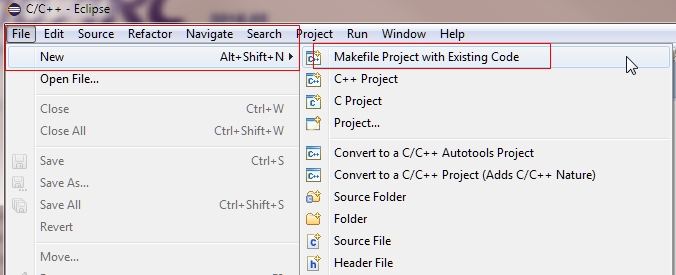
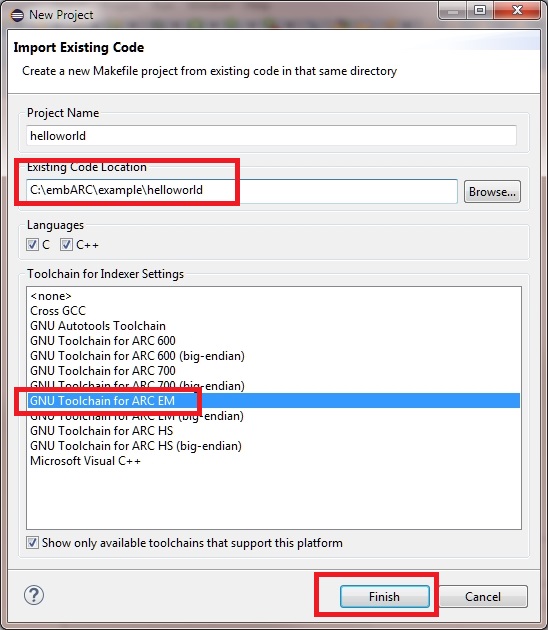
Create helloworld project in ARC GNU IDE
When the GNU IDE opens, click File->New->Makefile Project with Existing Code. Set Existing Code Location to your “helloworld” application. Set Toolchain for Indexer Settings to GNU Toolchain for ARC EM, and click Finish.
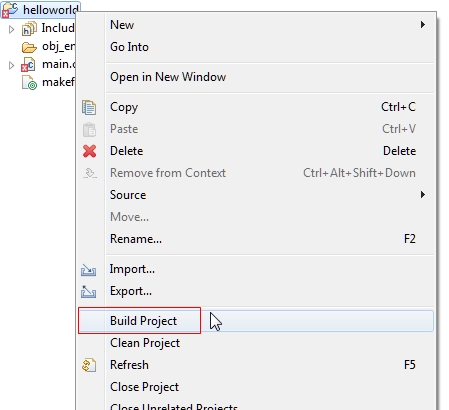
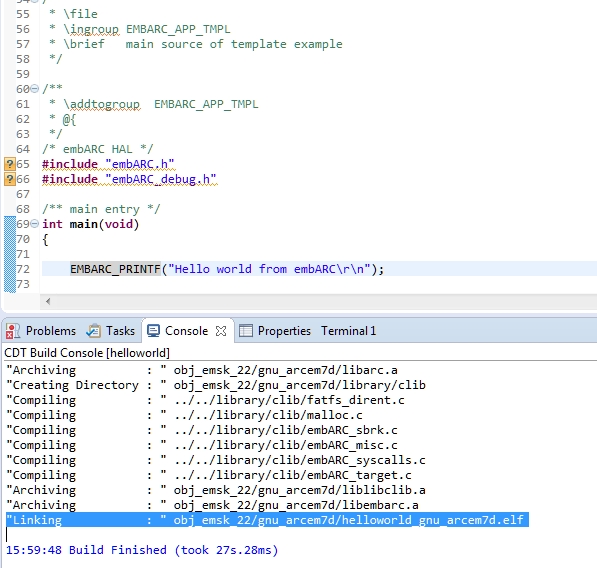
Set helloworld project in ARC GNU IDE
Build the projec in the IDE. When the build process is finished without any errors, open Debug Configurations, and create debug configuration for this project. Remember to choose the correct ELF file, and set the right Gdbserver Settings in the Debugger tab.
Create debug configuration helloworld project in ARC GNU IDE
Click Debug and debug the project in the IDE. For more information, see Debugging with OpenOCD in ARC GNU IDE
Debug helloworld project in ARC GNU IDE
Note
There are only application source code files added in the IDE project. The makefile is provided by embARC, not generated by the ARC GNU IDE itself.
Debug Multiple Boards
Multiple EMSK boards are required to run or debug application code on a single PC for some examples in embARC, especially the Pmod RF examples. Here are alternative ways for two EMSK boards running and debugging with one PC.
MetaWare Toolchain
In command-line mode, Ashling JTAG and USB-JTAG are necessary rather than multi-USB JTAGs. One node runs
make TOOLCHAIN=mw xxxx JTAG=opella xx, the other node runsmake TOOLCHAIN=mw xxxx JTAG=usb xx.In IDE mode, change the debugger configuration in one of the two nodes for Ashling JTAG. Because the Digilent JTAG Cable is the default option.
Another way for command-line mode is to modify the DIG_NAME option to choose different boards. DIG_NAME is a MetaWare debugger property corresponding to
-prop=dig_device=name.
ARC GNU Toolchain
In command-line mode, all nodes run
make TOOLCHAIN=gnu xxx JTAG=usb xx. OpenOCD selects the right board automatically. OpenOCD supports multi-USB-JTAG.In IDE mode, all projects share the same port for the OpenOCD configuration. The same GNU debugger port (49105) is used. To avoid a conflict with GNU debugger ports, set the different GNU debugger ports in the debug configuration.
Note
The above methods only support two boards, e.g., one EMSK 1.x and one EMSK 2.x. Two EMSK 1.x boards or two EMSK 2.x boards are not supported.